Redheadyogini
  • Home
  • Blog
  • Yoga/Barre
    • Schedule
  • Aplastic Anemia

Day 6-9: Handstands in the house

2/19/2014

0 Comments

 
Picture
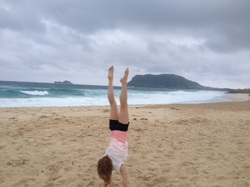
Day 6: The testing of household handstand locations begins. 

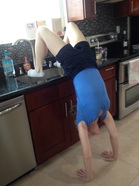
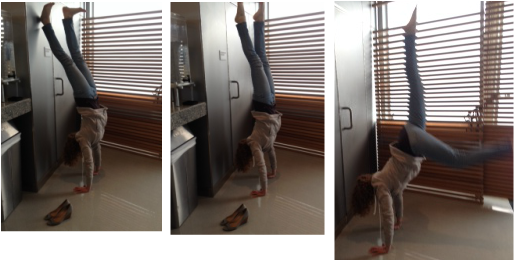
First off, the sink. This is a deeper backbend but offers some good opportunity to play with extending one leg straight up at a time. Warning here, it's much easier to do this version when someone is available to help you get out of the position without hitting your head on the cabinet handles.

Picture
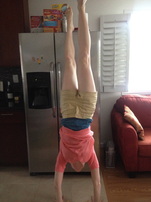
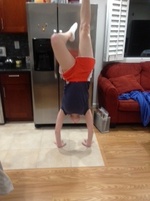
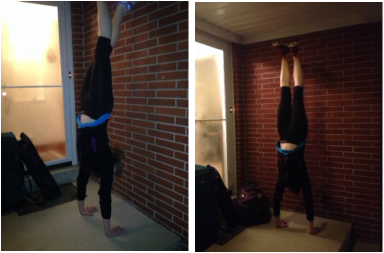
Day 7: I really like using the fridge, it seems to be the perfect height for me to practice pushing off from.

Picture
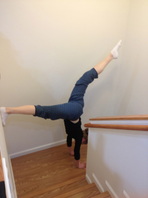
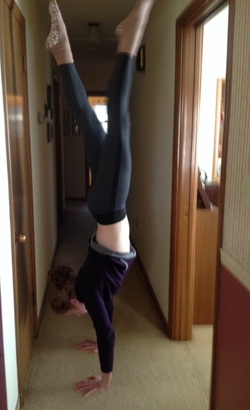
Day 8: Probably the best location in the apartment to do handstands since there is ample wall space on the landing. It is not however, the best place to take pictures of doing handstands. I was playing around with the L-shape handstand to get myself more practice without the wall directly behind me. I'll explain in another post how to do this variation. It's a great way to practice getting the proper alignment and to strengthen the arms.

Picture
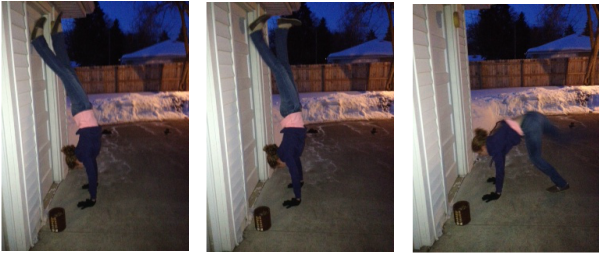
Day 9: Back to the fridge for backup. But now trying to take some inspiration from a yoga friend to have one leg bent to act as an anchor to balance the extended leg. The thing about doing handstands here, is that I have to be sure and turn off our overhead fan and that it stops spinning before I go upside-down...I certainly don't want any fan-inflicted injuries!

0 Comments

Day 5: Aloha (!) and spider-hands

2/15/2014

0 Comments

 
Picture
It's winter in Hawaii and what does that mean? Cooler temps (but still about 70 degrees warmer than back home), sporadic rain, and off-and-on gray skies. But that is certainly okay with me since it allowed us lots of personal beach time without crowds, that's a win in my book. We live over on the windier side of the island anyway, so I just have to get used to my hair turning into a bird's nest by the day's end. No volume worries here! 

First beach handstand and it's good to note that these are both harder and easier at the same time.
 Factors to consider: 
-Wind and it's direction, there was quite a bit pushing against my back body while inverted. This can certainly either help, hurt, or possibly not affect you at all. 
-Type of sand: fine, hard-packed, soft, or pebbly. This is all about a hand feel thing for me, this sand was fine, soft, and a bit easier to sink into, which for me made it a bit better to hold the inversion once I found my center of balance. 

In general when doing a handstand, I like to think of active, spider-like hands. Which if you've been a yoga student of mine, you're probably familiar with me saying "spider hands"! The first part to spider hands is spreading your fingers out instead of keeping them tightly together since you want to give yourself the widest possible base. The second part is to have the fingers slightly bent/curled to help you better grip, helping you grip better than if the fingers were flat and fully extended. Together, these two hand actions can help you have more control and stay up longer in the handstand position.

0 Comments

Day 3 & 4

2/15/2014

0 Comments

 
Picture
Day 3. All packed up (pretty much) and ready to head out to Hawaii in the morning. Last handstand, for now, at my parents'. Ready for some warmer weather!

Picture
Day 4. Early morning and very ready to leave the cold. At O'Hare in one of the cleanest floor spaces I could locate and where I was hoping not to draw too much attention to myself, haha. Thought an airport picture was going to be much safer for me and more acceptable to do than on the airplane. 

I also have this thing with my feet. I find that for me, having had a ballet background, finding the balance and length in handstand is easier for me to keep with my toes pointed and bare foot. When I'm wearing shoes, reaching through the heels seems a bit more effective since the weight/balance of the shoes on my feet shifts a bit from being barefoot. This is simply my own personal hypothesis, I think the method of one's finding balance is going to vary person to person.

0 Comments

Day 2-Gloves required

2/11/2014

0 Comments

 
Picture


Honesty, and the progression of the process. These photos document how this whole handstand process goes down, excuse the pun. Granted, I did manage to keep the legs up in the air unsupported for 4-5 seconds, so I'll take that. It also was 12 degrees at the time (pretty toasty out!) with a windchill of 0, so I also wasn't planning to stick around longer than I needed to. 

This process is also, at the moment, a way to help my mom get acquainted with iPhone photo-taking...she's progressing.

0 Comments

Handstand365

2/10/2014

0 Comments

 
Picture
Moderation, yeah, remember that idea? Changed my mind. 

While last week I said that I'd be starting a challenge for a month of handstands and possibly extending that to the full, ambitious year. In the end, I decided that the year just sounded better. I mean really, a handstand only has to take 10 seconds so why not just go ahead and do it? Or at least attempt it? Plus, I figured that committing to the year from the start makes the intention nice and clear, with less chance of me backing out. I figured that with a full year, I have plenty of time to work this little posture out and get myself further away from walls.

So today was officially Day 1, with camera work provided by my mom. 

0 Comments

30 Days of Handstands

2/6/2014

0 Comments

 
Picture
So, I'd like to offer a challenge. One that you can totally accept or decline. I'll be doing it too, so we can keep each other accountable. I got this inspiration from a fellow yogini and friend, the lovely Ms. Alex Moody who has committed to doing a year of handstands, you can check out her pictures on Facebook or Instagram (alexmoodyyoga). I'd like to be super ambitious and commit to 365 days too, but I figure baby steps is the way to start while I'm still in the recovery process. 

I've been doing some assisted handstands (with a wall/door/any large immobile upright object) the last couple weeks and figured, hey why not make it a fun little challenge. Since my PICC line is out and I'm now clear of the whole "don't do any inversions" phase, let's have some safe inversion fun. Also, for me at least, it involves getting over a minor fear. I don't have a problem with falling (well, at least I didn't used to), but there is just something about the handstand that can be intimidating. I could do headstands all day and have some fun with variations but handstands just feel different to me, mentally. So, it's time to overcome this minor fear.

If you would like to join me, please post a comment below. The challenge will start on Sunday, February 9th and end on Monday, March 10th. I'll be posting a picture of my day's handstand either here, on Instagram (seedie), or on Facebook...all depends on my mood. If you're the hashtag sort, you are welcome to include that as well (#handstand30). Throughout the challenge, I'll also try to offer some tips and info on handstands, if you're into that. You are welcome to use props, people, walls, or whatever you need to work your way towards a handstand. Also, since I DO NOT expect perfection, be honest and if it happens, post a picture of a handstand fail. Because hey, that's an attempt too and it's the process of working on the posture that is most valuable. Happy Handstanding!

0 Comments

Best pose ever

1/29/2014

0 Comments

 
PictureSweatshirt optional.
I agree, that's a pretty boastful statement for so humble a posture, but let's be honest, it's an awesome pose that most everyone can do. Viparita Karani, or as it's known by it's English name, Legs-up-the-wall, is a mild inversion that is considered a restorative pose.

Benefits:
-For the ladies: Increases micro-circulation in the reproductive tract, eases symptoms of PMS, cramps, and menopause.
-Therapeutic for arthritis, headaches, insomnia, and helps reduce blood pressure.
-Gently stretch for the hamstrings, lower back and neck .
-Helps take pressure off tired or cramping feet or legs.
-Eases anxiety and stress, calms the mind.

How to enter the pose:
1. Place a folded blanket on your yoga mat (not necessary) by the wall you'll use, about a foot or less from the wall and have an eyebag nearby. A washcloth can also work well to cover the eyes.
OPTIONAL: Instead of a blanket, you can use a bolster for an additional stretch along the front torso. You can also use a sandbag (or a heavy bag of rice) to place on the soles of your feet for further grounding through the legs and helps to release lower back tension. Use of a strap tied around the upper thighs, not too tightly, can also help focus on releasing through the legs.
2. Sit with your right side to a wall and your knees bent up in front of you, your right knee touching the wall and hands resting on the floor behind you. Let the knees fall to the left and rest on the floor (or towards it).
3. Lie down on your left side and as your start to roll to rest on your back, bring your legs up to rest the soles of your feet on the wall in front of you. 
4. With your bottom close to the wall (you can always move farther away if that is more comfortable) and your arms extending out on either side of your trunk, palms facing up, slowing walk your feet up the wall until the legs are straight and the heels are resting against the wall. Once here place the eye bag over your eyes. My preference is to place my arms cactus-style: straight out from the shoulders, bent at elbows, palms up.
Relax into the breath-slow and steady, calming the body and mind down and staying here for 5 minutes, if possible.

If you want to get "Deep" or meditative:
As the mind focuses on the breath and begins to calm down, focus on what fear you may have presently: acknowledge what the fear is (whether it's feeling unsettled from a life change or are they feeling sluggish?) and how that feels in the body (can you feel it or name the sensation?). Once that fear is named and feeling is located in the body, allow yourself to let it go. It may help to imagine a comforting red energy surrounding that fear, engulfing it and pushing it out through the soles of the feet, letting the heaviness of the fear be replaced with a sense of lightness and warmth, bringing fresh energy into the body. 

How to Escape:
To come out of the pose, gently bring the knees to the chest (removing sandbag from feet, if needed), rolling over onto one side and rest here for a few breaths to relax the legs before gently pressing yourself up into a seated position.

Cautions, check with your physician if you are: pregnant, have glaucoma, serious neck/back problems, or high blood pressure. This posture may still be accessible for you but may need to be modified via the use of props or the addition of a chair to properly support you.

0 Comments

Yoga: an introduction

1/22/2014

1 Comment

 
PictureA much warmer location.
I’m a yoga therapist and teacher, hence the blog name “yogini”. Which for those who are not yoga-inclined is the female version of a yogi. My intent has always been to talk about yoga, at least to some sort of regular extent. But for lack of eloquence, my own personal fears of failure, and not currently teaching students has hindered me from doing so until this point in time. What was the final impetus, my husband, the personal cheerleader.  

So, have I fallen off the yoga bandwagon? No, or not really. There was an extended time when we had house guests over the holidays and that really did inhibit my personal style of practice. As in I don’t want to be watched while I’m practicing, if you’re not doing it with me. But I worked around it and still got some good mat time in. The reality of it is that my personal practice is much different that what it was in August. I’m not doing headstands, or err, I’m not doing them regularly. Nor am I taking any in-person group classes, because (a) I really cannot chance getting sick, nor would I want to and (b) don’t think any heated studio is going to be up to the cleanliness standard that I’m needing to maintain with my PICC line. I’m being my own sensei.

Instead of acrobats and high heat, I’ve gone back to the basics a lot of the time and focusing on finding my grounding and some freedom of movement without causing pain. I’ve developed a habit of piecing together parts of different online classes or taking one class and just doing different poses as needed. Or heck, some days if I’m feeling motivated enough, I forgo the whole listening to someone else jive and completely do my own thing. There has even been the occasional “super” restorative class when I simply lay on my bolster and do yoga nidra. If you have no idea what this is, boy, are you missing out! (Think super-awesome, relaxing nap time.)

And, that’s the beauty of yoga! Yoga is a practice that accommodates to your needs, if you allow it to, instead of feeling that you have to force yourself into a certain yoga mold. As I’ve gone through different phases over the last few months from severe bouts of nausea to anemia in general or adjusting postures to accommodate to my PICC line, its always about the personal practice and how I feel.

So, while like this blog, it can be scary to put myself out there and talk about my yoga practice or why I might do the postures I do, I hope that I can help inform others about yoga from my current perspective. 

1 Comment
Forward>>

    Author

    A redheaded, yoga-lover/teacher, runner, and wife currently dealing with a little medical setback.

    Picture

    Archives

    January 2015
    October 2014
    August 2014
    July 2014
    May 2014
    April 2014
    March 2014
    February 2014
    January 2014

    Categories

    All

    RSS Feed

Powered by Create your own unique website with customizable templates.